How to Create an Action in Photoshop
by Cody Johnson | Jul 13, 2012 | How Tos
By now almost anyone interested in digital photography will have heard of the editorial software known around the world as Photoshop. It is a major tool kit for improving the results of photographs, but it can also create a tremendous array of results too. For instance, you can take almost any image and do a remarkable conversion from color to black and white with the Photoshop package, but the results from this are going to be extremely flexible and much better than a "one click" conversion through a traditional photo editing package.
What do we mean? To begin with you have to understand that all images have their primary or focal colors, but they also have "mid-tones" too. If you use the one button conversions that are packaged with a lot of point and shoot camera gear you are going to discover that your color image looks pretty "flat" when black and white. This is because any of the mid-tone hues have been erased by the conversion process.
You can easily avoid this by using the Photoshop tools, and you can ensure that there is plenty of contrast remaining afterward. The great thing about Photoshop is that you can also dictate the way that the contrast works through the use of different filters as well. Which of the filters? It really depends on the results desired, but the proverbial "rule of thumb" is to increase the contrast of the specific area of the shot by selecting and using a filter that is complimentary to it.
For this we ask you to visualize a color wheel in your mind. The complimentary color is actually the one on the opposite side of the wheel - for example, red would be complimented by green. So, if you are going to use Photoshop to convert an image to black and white while also keeping enough contrast to make the image deep and effective, you have to apply filters to the RGB color channels. It is very easy, but you may want to "create an action" so that you can begin doing one click conversions instead of this multi-step process in the future.
Let's quickly go over how to record your action and save it for future use, and then we'll master the conversion process. You begin by choosing the "New Action" dialogue. You then give the action a name such as "BW Conversion with Contrast". You will want to choose an "F" key to allow you to hit the shift button along with the F key, such as F5, and then see the changes applied.
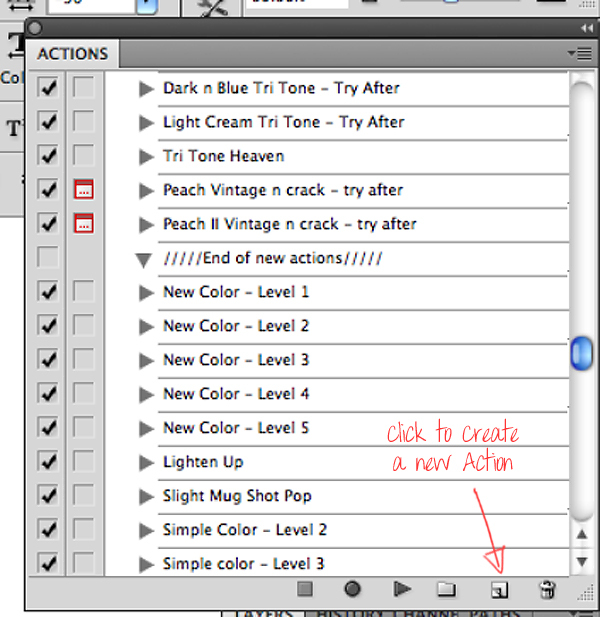
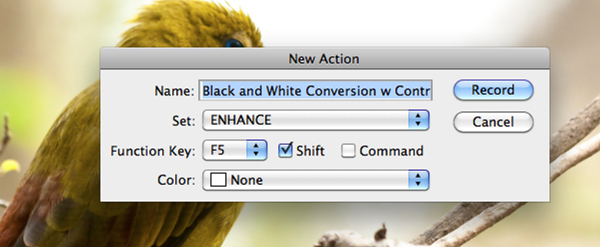
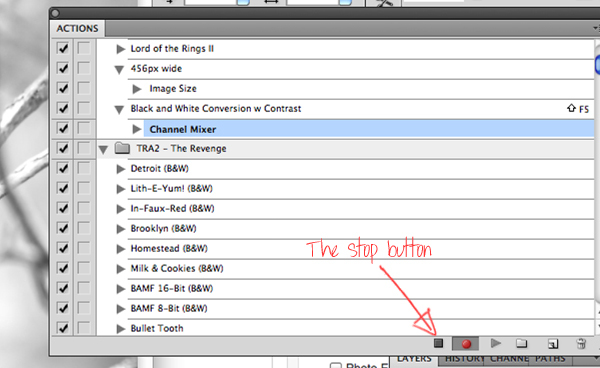
Once you hit the "Record" button, the system is documenting every step made, but you don't have a time limit, so just be sure you are doing only the steps that will apply "universally" to all of your future conversions. Did you just make a mistake? Don't worry because you can review all of the action steps, remove or add things, and even re-record if necessary before saving it. Hit the Stop button and indicate if you have any parts of the process that need to have "stop dialogues" inserted. For instance, do you need an "OK" button to appear at any point? If so, insert it now. Test out the process and see how it goes, and then begin using it for your work. Now that you know how to create the action, let's go ahead make the conversion properly.
The experts at the
CambridgeInColour.com website give a very simple explanation of the channel mixing process, but they do warn that "it may take some time to master since there are many parameters which require simultaneous adjustment." You follow the Image - Adjustments - Channel Mixer path. Immediately click the "Monochrome" button in the lower corner for your black and white conversion.
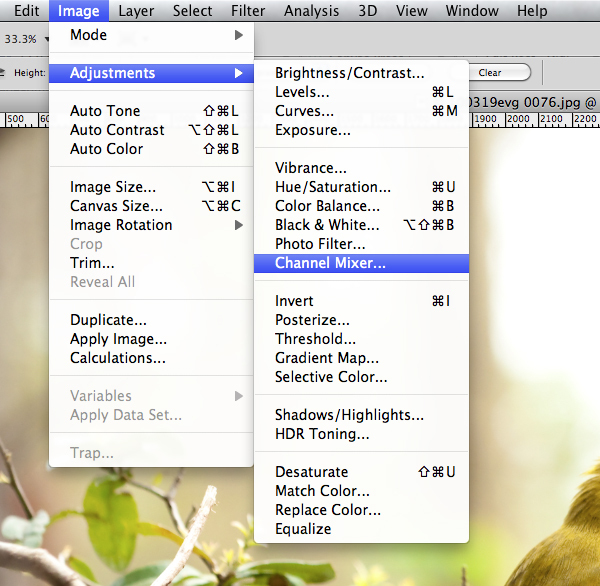
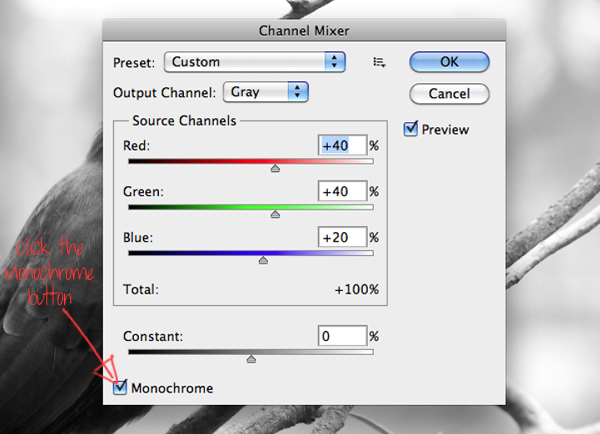
You then adjust the sliders for Red, Green and Blue according to your needs as described earlier. Remember that we said to increase the contrast of the specific area of the shot by selecting and using a filter that is complimentary to it? This is when you will enhance the strength of those RGB channels according to the needs you determined earlier.
Remember, however, that RGB channels have to equal 100% to maintain the brightness of the image or you have to make another adjustment to that. You may want to determine the levels (bright, dark, or contrast of photo) desired for your conversions before recording this as an action, and to make a few different variants of this action as well.
Now go back to the Action dialogue and you will see the steps you have taken. All it is doing is recording each step you take in processing the photo. Be sure to press STOP to complete your action. You can even record saving and closing of images if you want to. This can make your life a little easier when you want to make the same changes to several photos or if you have a special effect that you only want to apply to one photo but it is time consuming. Just do it once and you are done.
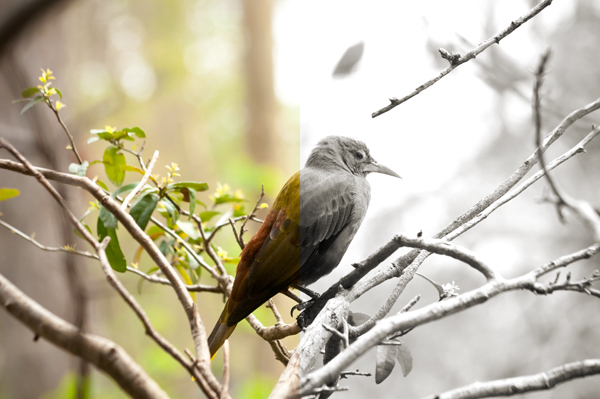
This work is going to make for very high quality prints of your images and may even make top of the line photo canvas prints in black and white too thanks to the contrast you have kept in the conversion.

 Once you hit the "Record" button, the system is documenting every step made, but you don't have a time limit, so just be sure you are doing only the steps that will apply "universally" to all of your future conversions. Did you just make a mistake? Don't worry because you can review all of the action steps, remove or add things, and even re-record if necessary before saving it. Hit the Stop button and indicate if you have any parts of the process that need to have "stop dialogues" inserted. For instance, do you need an "OK" button to appear at any point? If so, insert it now. Test out the process and see how it goes, and then begin using it for your work. Now that you know how to create the action, let's go ahead make the conversion properly.
The experts at the CambridgeInColour.com website give a very simple explanation of the channel mixing process, but they do warn that "it may take some time to master since there are many parameters which require simultaneous adjustment." You follow the Image - Adjustments - Channel Mixer path. Immediately click the "Monochrome" button in the lower corner for your black and white conversion.

 You then adjust the sliders for Red, Green and Blue according to your needs as described earlier. Remember that we said to increase the contrast of the specific area of the shot by selecting and using a filter that is complimentary to it? This is when you will enhance the strength of those RGB channels according to the needs you determined earlier.
Remember, however, that RGB channels have to equal 100% to maintain the brightness of the image or you have to make another adjustment to that. You may want to determine the levels (bright, dark, or contrast of photo) desired for your conversions before recording this as an action, and to make a few different variants of this action as well.
Now go back to the Action dialogue and you will see the steps you have taken. All it is doing is recording each step you take in processing the photo. Be sure to press STOP to complete your action. You can even record saving and closing of images if you want to. This can make your life a little easier when you want to make the same changes to several photos or if you have a special effect that you only want to apply to one photo but it is time consuming. Just do it once and you are done.
 This work is going to make for very high quality prints of your images and may even make top of the line photo canvas prints in black and white too thanks to the contrast you have kept in the conversion.


