How to Use Adobe Photoshop Express Crop & Rotate
by Cody Johnson | Feb 17, 2012 | Advice
Allow me to introduce you to our fabulous Intern Melissa Lidey. Melissa is a senior Marketing major at St. Edward's University. She is going to be writing a series of tutorials on how to use Adobe Photoshop Express to crop and edit. She has no photography experience so she is learning on the job. I think she is doing a dang good job too. - Eric
Melissa, take it away -
Do you need a place to edit your photos? Not completely satisfied with your digital camera photo editing software? Wishing you had Photoshop, but don’t have $500 to drop? Well you are in luck! There is a FREE software program where you can edit your photos right from your home computer or laptop. Adobe Photoshop Express Editor! This is an easy way have a professional editing program, that you do not have take out a small loan to purchase, and you will be processing your photos like a pro in no time. While I have come across a few downsides to the Photoshop Express Editor, if you are looking for a quick, professional and FREE place to edit your photos this a great option. First you will have to go to Photoshop.com and create an Adobe account. It is very simple, only takes a few minutes and it’s free. After you have created your account you can upload photos or entire albums to Express Editor. I've found that the load time for express editor is surprisingly pretty quick. Once you have uploaded your photos, you will be ready to edit.
The first tool I want to show you is the Crop and Rotate tool. One thing I've noticed that you cannot really preview your photo before you save it to your computer or upload it to Facebook. So you may have to play around with your photo a few times before you really get the hang of it. This is an example of the photo I was working with. I'm trying to rotate and crop this adorable baby so she is more up-right instead of leaning to the side.
This is what the photo looks like before I have done any editing to her. Adorable, right?!

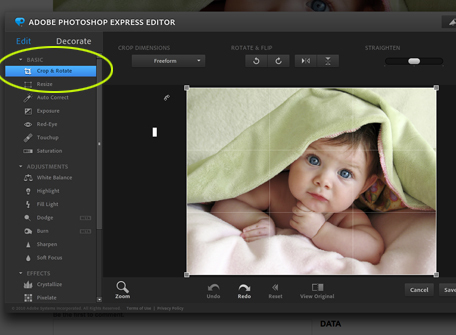
To start cropping and rotating this picture you first need to click on the Crop & Rotate tap on the left hand side of the program. Once you are on this tab you'll be able to crop and rotate away! There are a couple of Crop Dimension options you can choose from: Freeform, Original Ratio, Square, 2x3, 4x6, 5x7, 8x10, and US Paper.

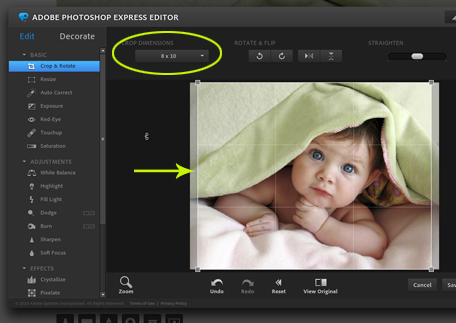
Once you've chosen your dimension option, you will be able to continue to edit/crop your photo. I choose to work with the 8x10 size photo. Once I choose this size it slightly brought in the sides of the photo to adjust the sizing. You may need to play around to see what size photo you are wanting.

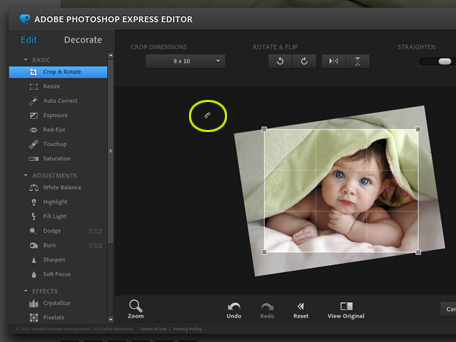
After I choose my photo size, I wanted to rotate her so that she doesn't appear to be leaning over as much. There are a few ways you can go about doing this. There is a "Straightening" tool at the top of the screen where you can slide the button make and forth to adjust the picture, or you can move your mouse to the side of the photo and it will turn into a half-mood shaped icon and you can adjust from there. Either one of these ways will get the job done. Although, this will also change the size of the photo, so beware. I adjusted the baby just slightly so she appears more upright. This is what it looks like before I finalized and saved the photo.

You can see how the image was adjusted to appear a little more level. After you are satisfied with your editing, you click done and it will take you through a few steps of saving or uploading your photo and then you will come out with your finished product! ! Here is what my photo looked like after a few editing steps and rotating her: Now I am ready to post the image to Facebook, Flickr or order a few canvas prints for the parents and grandparents.

 To start cropping and rotating this picture you first need to click on the Crop & Rotate tap on the left hand side of the program. Once you are on this tab you'll be able to crop and rotate away! There are a couple of Crop Dimension options you can choose from: Freeform, Original Ratio, Square, 2x3, 4x6, 5x7, 8x10, and US Paper.
 Once you've chosen your dimension option, you will be able to continue to edit/crop your photo. I choose to work with the 8x10 size photo. Once I choose this size it slightly brought in the sides of the photo to adjust the sizing. You may need to play around to see what size photo you are wanting.
 After I choose my photo size, I wanted to rotate her so that she doesn't appear to be leaning over as much. There are a few ways you can go about doing this. There is a "Straightening" tool at the top of the screen where you can slide the button make and forth to adjust the picture, or you can move your mouse to the side of the photo and it will turn into a half-mood shaped icon and you can adjust from there. Either one of these ways will get the job done. Although, this will also change the size of the photo, so beware. I adjusted the baby just slightly so she appears more upright. This is what it looks like before I finalized and saved the photo.
 You can see how the image was adjusted to appear a little more level. After you are satisfied with your editing, you click done and it will take you through a few steps of saving or uploading your photo and then you will come out with your finished product! ! Here is what my photo looked like after a few editing steps and rotating her: Now I am ready to post the image to Facebook, Flickr or order a few canvas prints for the parents and grandparents.


